Как создать модель пирамиды — 3 способа с инструкциями на wikiHow
Building a model pyramid is quite easy if you have the right materials and know how to carefully measure, cut, and glue. You can make a simple pyramid out of cardboard or paper. To do this, carefully measure and cut each face of your pyramid and attach them together with glue or tape. For a different style of pyramid, you can make a step pyramid out of sugar cubes and glue. Regardless of the material that you choose to use, building a model pyramid can be an easy way to complete a school project while having fun building something from scratch.
-
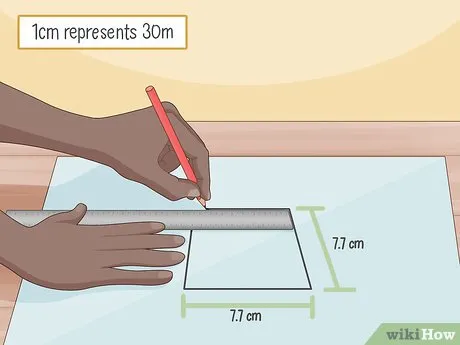
Measure and draw out a square using a pencil and ruler. Use a pencil and a ruler to draw out a square on a sheet of clean paper. Hold the ruler in your nondominant hand and use the side of the ruler as a straight edge to draw each side of your square.[1]
- Make your square 7.7 by 7.7 centimetres (3.0 by 3.0 in) to create a scale model of the Great Pyramid! Every 1 centimetre (0.39 in) will represent 30 metres (98 ft) of the pyramid.
-
Draw 4 symmetrical lines that start on each side of your square. Use your ruler to calculate the midsection of each side of your square. Mark the spot where you need to place each line with a small hash mark and then rotate your ruler to draw each line perpendicular to the square’s side.[2]
- For the Great Pyramid scale model, place each line 3.85 centimetres (1.52 in) in from the corner of each side, and make it extend 6.2 centimetres (2.4 in) out from the square.
- If you’re not building the scale model of the Great Pyramid, you have to draw each line so that it’s big enough to meet the other faces of the pyramid in the center. To be safe, make each line at least the same length as a single side of your square.
Advertisement
-
Connect each line to the adjacent corners with your pencil. Use your ruler to line up a connection between the top of each line and the corner on each adjacent side. Start at the top of a line and draw a connecting line to the corner of the square on the left. Draw a symmetrical line going from the top of the line to the corner on the right. Sketch your lines out using the ruler and pencil until you’ve drawn 8 connecting lines to their corresponding corner on the square.[3]
- You should now be looking at 4 triangles that share a base with the 4 sides of your square.
- For the scale model, each connecting line should be 7.3 centimetres (2.9 in).
-
Cut out your pyramid carefully with a pair of scissors. Hold the paper in your nondominant hand and use a pair of scissors to cut along the exterior edges of your shape. Continue cutting along the edges until you’ve cut out the entire drawing. It should look like it was cut out in one continuous cut.[4]
Tip: To make cutting around the sharp angles easier, rotate the paper in your hand instead of trying to turn the scissors.
-
Fold each face of the pyramid towards the middle. Lay your cut-out shape flat on your work surface. Use your nondominant hand to brace the paper along each side of your square before folding each triangle towards the center. Use the pad of your finger to firmly press down along each fold. Continue until you’ve folded every side of your pyramid towards the center.[5]
- You can fold each face so that it lays flat in the center before folding the next section if you want to get each side out of the way. This may make folding much easier.
-
Tape the edges of the pyramid’s faces where they meet. Pull each folded edge out until each triangle is sitting flush against one another. Use clear tape to permanently join each edge together. Use long pieces of tape, and put each strip on the side of your triangles at the line where they meet one another before pressing lightly along the sides.[6]
- Press your tape down slowly and delicately. There’s nothing but air inside your pyramid, and you don’t want to crush it while you’re taping it.
-
Cover your pyramid with glue to add sand if you want to make it realistic. Place your pyramid in a small, plastic sandwich container or paper plate to catch the sand that you’re going to pour over the pyramid. Use a paintbrush to apply white glue to each face of your pyramid. Spread it liberally across each visible surface until the entire structure is wet.[7]
- While you certainly want to cover each side of your pyramid, avoid using heavy globs of glue. You don’t want to weigh your pyramid down and ruin the paper.
-
Sprinkle sand over the top of your pyramid. Slowly pour sand over the top of your pyramid, covering each side of the structure as you pour. Use a spoon to scoop sand that falls to the bottom of your container on top of the areas that are missing sand. Repeat this process until each section is fully covered. Wait 45-60 minutes for your pyramid to fully dry before handling it.[8]
Advertisement
-
Draw out 4 triangles of equal size on a piece of cardboard. Each triangle has to be exactly the same size to make a perfect pyramid. Measure your base first and then draw a line extending from the center. Use a ruler as a straight edge to draw connecting lines between the top of your center line and each end of the triangle’s base.[9]
- To make a medium-sized pyramid, make each triangle 8 inches (20 cm) wide and 12 inches (30 cm) tall from the center.
-
Cut your triangles out with scissors or a utility knife. Place your cardboard on a stable work surface and hold it in your nondominant hand. Use your dominant hand to cut along each side of each triangle. Continue cutting until you have 4 triangles of equal sizes.[10]
- If your cardboard is too thick to be cut with scissors, put a cutting board down and lay each piece of cardboard flat. Use a utility knife to cut each triangle out by dragging it through the cardboard along each section of your outline.
-
Glue 2 triangles together at the edge with a glue gun. Plug in a glue gun and set it down nearby to let the glue heat up. Use both hands to hold 2 triangles with their bases flat on the work surface and lean them together so that 2 of their edges meet. Use your nondominant hand to hold them together near the top as you grab your glue gun. Pull the trigger on the glue gun as you slide it along the edge where your 2 faces meet.[11]
- Hold your 2 sides still for 45-60 seconds to give your glue time to initially dry. Set your 2 pieces aside and leave them for 10-20 minutes to let the glue fully set.
-
Attach your other 2 sides together and combine your pieces. Glue the other 2 sides together the same way and let them air dry. Once you have 2 pieces, arrange them in the center of your work surface so that each remaining edge is connecting. You should be looking at an unglued pyramid at this point. Use your glue gun to run hot glue along the 2 remaining edges and let it dry for 10-20 minutes.[12]
- After you put glue along the 2 remaining edges, lightly press your pieces together for 30-45 seconds to keep any gaps closed as it dries.
-
Draw and cut out a square base for your pyramid. You can draw your base out so that it fits perfectly around your pyramid by holding your glued triangles in place and using the base of each face as a straight edge. You can also choose to make a bigger base by measuring 4 lines of qual distance out from each side of the pyramid. Use a straight edge and a pencil to sketch your base and cut it out with scissors or a utility knife.[13]
- For a medium-sized pyramid, a good base is 14 by 14 inches (36 by 36 cm).
-
Draw vertical and horizontal lines with a permanent marker to make bricks. To make your pyramid look like it’s made out of individual bricks, draw a series of parallel lines horizontally along each face of your pyramid with a black marker. The lines don’t need to be perfectly straight if you want it to look natural, but you can choose to make them even with a straight edge if you’d like. Make vertical marks between each horizontal row every 1–2 inches (2.5–5.1 cm) to create the appearance of individual bricks.[14]
Tip: The bricks are only going to partially show through after you cover the pyramid in glue and sand, so don’t worry if you make a mistake.
-
Use a butter knife or popsicle stick to spread glue over each face. Drizzle white glue over your pyramid and use the flat side of a popsicle stick or butter knife to spread it around. Continue spreading the glue until you’ve covered most of the pyramid.[15]
- Don’t forget about the base! Spread a lot of glue around your base so that the sand can fully cover it.
-
Sprinkle sand over your pyramid to make it look real. While the glue is still wet, pour sand all over your pyramid. Slowly pour your sand 4–6 inches (10–15 cm) above each section of your pyramid and let it collect at the base to give your pyramid a realistic look. Let it air dry for 1-2 hours before touching it.[16]
- If you want more of the bricks that you drew to show through, you can scrape sections of your pyramid with your knife or popsicle stick to knock some of it off.
Advertisement
-
Spread glue across the surface of a paper plate. Pour white glue on top of your plate. Use a paintbrush to spread it evenly over the surface where you want to build your pyramid. This will serve as the base, so make sure that each section has some glue on it.[17]
- You can use a Styrofoam tray or wood surface as a base if you prefer.
- You’ll need 140 cubes for a 7×7 pyramid.
-
Place sugar cubes in a 7×7 square. Start with a corner of your pyramid. Place your first sugar cube in the glue and press down lightly to set it in place. Continue placing cubes next to it in both directions until you have 7 cubes on each side. Fill in the rest of the open space in your square with sugar cubes.[18]
Tip: Don’t press down too hard on your initial layer or you’ll risk breaking a cube. You don’t need much pressure to get the cube to stick to the glue, since sugar cubes are porous.
-
Drizzle glue in a 6×6 square on top of your first layer. Use the gaps between cubes to determine where a 6×6 layer will rest on top of the first layer. Pour glue in a square along the edges of your 6×6 outline and then fill in the middle of the square with glue. Put at least one dollop of glue on each interior square to ensure that the upper layer remains in place.[19]
-
Add your 6×6 layer of sugar cubes by putting them on top of the glue. With your glue still wet, begin to place cubes in a 6×6 row on top of your first layer. Line each cube up so that it rests directly on top of a cube underneath it. Do not press down on your cubes as you place them.[20]
- Save time by setting your layer out on a separate plate and transferring it over by pinching an entire row between two fingers.
-
Continue this process until you’ve completed a pyramid. Place additional layers on top of your pyramid by moving in 1 cube at a time for each layer. Your next layer will be 5×5, then 4×4, and so on. Add a new layer of glue each time that you add a layer.[21]
- Do not leave cubes out of the middle of a layer or you’ll risk breaking your pyramid.
- You can use glue and glitter, sand, or paint to cover your cube if you’d like.
Advertisement
-
Question
Can I do this with sugar cubes?
Yes. You’d need at least 100 sugar cubes, though. You’d also need cardboard, rubber cement and sand, but you can do it.
-
Question
How can I make hollow sugar cube pyramids?
Just stack them in the pyramid shape that you desire. If you want it to be edible, you can use icing as glue, if not, you can use regular glue.
Ask a Question
200 characters left
Include your email address to get a message when this question is answered.
Advertisement
Video
Thanks for submitting a tip for review!
Things You’ll Need
- Paper
- Pencil
- Ruler
- Scissors
- Tape
- Glue
- Small container
- Sand
- Cardboard
- Pencil
- Ruler
- Scissors or utility knife
- Glue gun
- Glue sticks
- Permanent marker
- Glue
- Butter knife or popsicle stick
- Sand
- Paper plate
- Sugar cubes
- Glue
- Glitter, paint, or sand (optional)
References
About This Article
Whether you’
Будь то создание простой геометрической фигуры или масштабной модели Великой пирамиды Гизы, изготовление бумажной пирамиды – дело несложное! Сначала, с помощью линейки и карандаша, на чистом листе бумаги обведите квадрат. Затем, используя линейку, определите середину каждой стороны квадрата. Проведите линии одинаковой длины из центра каждой стороны под прямым углом 90 градусов.
Если актуально, также можно рассмотреть, как построить пирамиду, включив этот аспект в обсуждение.
 Read on to learn how to make a model pyramid out of cardboard.
Did this summary help you?
Thanks to all authors for creating a page that has been read 240,661 times.
Did this article help you?
Как правильно построить баню?
Постройка бани может быть сложным процессом, требующим знаний в области строительства и электротехники. Вот некоторые шаги, которые могут помочь в построении бани:
-
Выбор места для бани: выберите место, где вы сможете легко подключить воду и электричество. Убедитесь, что место находится вдали от деревьев и зданий, чтобы избежать пожаров.
-
Планирование и проектирование: определите размеры и тип бани, которую вы хотите построить. Нанесите план на бумаге и убедитесь, что вы учли все необходимые элементы, такие как раздевалки, парильные, душевые, санузел и т.д.
-
Определение материалов: выберите качественные материалы для постройки бани, такие как древесина, кирпич, бетон и т.д. Убедитесь, что все материалы имеют необходимые сертификаты качества.
-
Строительство фундамента: баня должна иметь качественный фундамент, чтобы противостоять нагрузкам и вибрациям, создаваемым парильной печью и посетителями.
-
Установка крыши: крыша должна быть качественной и противостоять атмосферным явлениям.
-
Установка окон и дверей: выберите качественные окна и двери, которые будут сохранять тепло и не допускать проникновение воды и влаги.
-
Установка парильной печи: печь должна быть установлена профессионалами и соответствовать требованиям безопасности.
-
Установка системы водоснабжения и канализации: убедитесь, что система водоснабжения и канализации соответствует нормам безопасности и не приведет к проблемам в будущем.
-
Установка системы электроснабжения: система электроснабжения должна соответствовать нормам безопасности и обеспечивать безопасное использование электроприборов.
-
Отделка внутреннего и внешнего пространства: выберите качественные материалы для внутренней и внешней отделки бани.
Постройка бани — это сложный процесс, и для достижения наилучшего результата л
Шаг 5: Окончательное оформление проекта и подготовка к строительству
После того, как проект бани завершен, нужно оформить его окончательно и подготовиться к строительству. На этом этапе вы можете попросить у проектной организации полный комплект чертежей и спецификаций, а также подробный список материалов и оборудования, которые будут необходимы для строительства.
Если вы собираетесь строить баню самостоятельно, то вам потребуются навыки и опыт в области строительства, а также инструменты и оборудование. Если вы не уверены в своих способностях, то лучше обратиться за помощью к опытным строителям.
Шаг 6: Строительство
После того, как все подготовительные работы выполнены, можно начинать строительство бани. Как правило, первым делом проводится земляные работы и устройство фундамента. Затем возводятся стены, кровля и перегородки.
Не забывайте про вентиляцию и утепление бани. Вентиляция должна быть организована таким образом, чтобы обеспечивать поступление свежего воздуха и удаление отработанного. Утепление поможет сохранить тепло и создать комфортные условия для пребывания в бане.
Шаг 7: Отделка и оборудование
После завершения строительных работ можно приступать к отделке бани. На этом этапе устанавливаются окна и двери, проводится электрика и сантехника. Также нужно заняться отделкой стен, пола и потолка.
Для бани нужно выбирать материалы, которые выдерживают высокую температуру и влажность. Например, для отделки пола и стен можно использовать дерево, керамическую плитку или камень. На потолок лучше установить вагонку или другой древесный материал.
Что касается оборудования, то для бани потребуется печь, бочка для воды, душевая кабина и прочие элементы. Лучше выбирать оборудование от известных производителей, чтобы гарантировать его качество и надежность.
Шаг 8: Отдых в бане
После того, как б
Кроме того, необходимо заботиться о вентиляции, чтобы в бане была свежая и чистая воздух. Для этого можно установить вентиляционную систему или просто оставить возможность проветривания, например, с помощью вентиляционного отверстия. Также важно предусмотреть систему сброса конденсата, чтобы избежать появления плесени и грибка внутри бани.
Не менее важным аспектом является безопасность во время посещения бани. Необходимо установить качественную и надежную электропроводку, не использовать легковоспламеняющиеся материалы при отделке и установить систему пожаротушения.
Также стоит уделить внимание удобствам для посетителей, таким как раздевалки, душевые, туалеты и места для отдыха. В идеале, баня должна быть уютной и комфортной, чтобы посетители могли наслаждаться отдыхом и оздоровлением.
В целом, построить баню – это задача не из простых, но если учесть все вышеуказанные аспекты и обратиться к профессионалам за помощью, то можно создать настоящий уголок здоровья и комфорта.