Руководство по покраске стен линиями: 12 шагов (с изображениями) — wikiHow
Painting stripes on your wall is a great way to change up a room without doing expensive remodeling. Stripes look wonderful on an accent wall in a large room, or they can cover all of the walls in a small room, like a bathroom. When you’re deciding where and how to paint stripes, you should pick between horizontal or vertical stripes, and then you can mark the design on the wall with tape and begin painting![1]
-
Choose between horizontal or vertical stripes. Look around your room and decide where you’
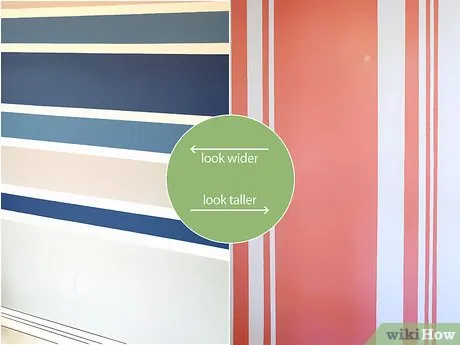
Если вы хотите добавить рисунок стенам, можно использовать линии. Если вы хотите, чтобы комната выглядела более длинной или широкой, выбирайте горизонтальные полосы. Чтобы придать потолкам визуальную высоту, стоит выбрать вертикальные полосы, которые достигают верхней части стены. Если на стене есть элементы, такие как светильники или окна, помните, что они могут перерывать полосы и уменьшить визуальный эффект.
- Don’t be afraid to get creative when it comes to picking a pattern. You can even do diagonal stripes for an interesting and eye-catching design. You can also go out of the box with a chevron design or stripes of varying widths.
-
Pick 2-3 coordinating colors for the stripes. Once you decide on a design, choose a color scheme for the stripes. Opt for monochromatic warm tones, like red, orange, yellow, brown, cream, or tan, for an inviting and cozy space. If you want to make a bolder statement, go for cool, contrasting shades, like blue, purple, black, white, or silver.[3]
- If you’re having trouble figuring out your shades, consult a color wheel for assistance, or look at photos of striped walls online for some inspiration.
Types of Color Schemes
Monochromatic schemes are similar tonal combinations that use several shades of a single color for a subtle effect. For example, if you use a very light pink, slighly light pink, and just regular pink, then you’re using a monochromatic scheme.
Analogous schemes combine colors that are similar in tone and feel, but are not the same hue, like green, yellow, and orange.
Contrast schemes are composed of colors dissimilar in hue from each other, like white, red, and black.
Complementary schemes use two hues opposite one another on the color wheel for intense variation, such as blue and orange.
Advertisement
-
Remove all furniture from the room and lay down a drop cloth. If you’re painting the entire room with stripes, move as much furniture as possible out of the room. If you’re only painting one wall, push any furniture that’s on that wall into the middle of the room. Then, lay down drop cloth or plastic to prevent paint drips from staining your floor or carpeting.[4]
- You should also remove anything that’s hanging on the walls that you will be painting, like pictures or shelves. This will ensure that you get crisp, clean stripes with no interruptions.
-
Paint the entire wall with 2 coats of your base color. Choose the lightest shade in your color scheme for the base, since it will be easier to paint over a lighter hue than a darker one. Use a roller to apply the first coat of paint evenly, and let it dry for 24 hours. Then, apply a second coat with the roller for more coverage.[5]
- If the wall is already a color that’s part of your scheme, you don’t have to apply fresh paint.
-
Let the base coat dry for 48 hours before marking and taping. After you apply the 2nd coat of paint, let the paint dry completely before you begin the process of adding stripes. This will help to prevent chipping or peeling of the base color when you remove the tape from the stripes.[6]
- If the paint isn’t dry when you begin marking and taping, you can smear the paint and ruin your stripes. Be patient!
Advertisement
-
Measure the wall and divide by the number of stripes to find the width of each. If all of your stripes are going to be the same width, use a tape measure to find the length or height of the wall. For vertical stripes, measure the length of the wall, and for horizontal stripes, measure the height. Then, divide the measurement by the number of stripes you’d like to have.[7]
- For example, if you have a wall that is 144 inches (370 cm) long and you want to paint 16 vertical stripes, you would divide 144 inches (370 cm) by 16 to find that each stripe should be 9 inches (23 cm) wide.
- If you’re doing chevron stripes, you’ll still measure the wall the same way to decide where to start the stripes.
Tip: Be sure to pick a ladder or step stool that allows you to reach every part of the wall. This will help when it comes time to mark, apply tape, and paint the walls!
-
Use a ruler to mark the sides of the stripes on the wall. Start at the top left corner of the wall and measure down for horizontal stripes or to the right for vertical stripes, measuring the width of 1 stripe. Mark a small “X” with a pencil, and measure the width of another stripe from that mark, continuing until you’ve marked and marked the edges of each stripe. Once you finish one side, move to the opposite side of the wall and repeat the process.[8]
- For instance, for 16 vertical stripes on a wall that is 144 inches (370 cm) long, you would mark the edges of each stripe with 9 inches (23 cm) of space between the marks along the top of the wall. Once you’ve marked all of them, you would do the same along the bottom of the wall.
- For chevron stripes, you should also mark the high and low points of each stripe, keeping an equal distance between the top of the strip and the bottom of the stripe.
-
Connect the marks for the edges of the stripes with a level. Use a carpenter’s level or a laser level to line up the markings on the top and bottom or left and right side of the wall so they’re perfectly straight. Then, run your pencil along the level lightly to make a straight line, which will be the edge of your stripe.[9]
- If you don’t have a level, you can have 2 people hold the ends of a tape measure in place and carefully run your pencil along the tape measure to connect the markings.
- If you’re painting chevron stripes, hold the level at an angle to connect the dots at the high and low points of each stripe, making a zig-zag pattern.
-
Lay painter’s tape over the lines and press down firmly on the tape. Lay the tape so that it sits just outside of the line that you marked for the stripes, creating stripes that are the correct width. This will ensure that none of the paint gets onto the base color and that all of the stripes are the correct width.[10] Then, run your hands down the tape, pressing firmly to prevent the paint from bleeding under the tape.[11]
- If you’re worried about the paint bleeding, run the edge of a credit card firmly over the tape to press it down onto the wall. This will create a stronger seal.
- For chevron stripes, your tape lines should meet at the high and low points of the stripe.
Advertisement
-
Paint around the perimeter of the stripes with a mostly dry paintbrush. Dip a medium-sized dry paintbrush into the color that you want your stripe to be, and let the paint drip off of the brush until it’s mostly dry. Then, paint along the tape on the inside of the stripe to make a large rectangle, also known as “cutting in” the shape, which helps to prevent bleeding when you use a roller.[12]
- You only need to apply 1 coat of the perimeter paint to prevent bleeding before you use a roller.
- Don’t be afraid to get some paint on the tape, but be careful not to get it on the areas where you want the base color to show!
-
Use a small roller to apply 2 coats of paint on the stripes for even coverage. Dip a small, medium-nap roller into your paint, and roll it out a little on a piece of cardboard or a paint tray. Then, use long, even strokes to apply the paint to the stripe, working on 1 stripe at a time. Once you’ve completed the first coat on all the stripes, let the paint dry for 24 hours and apply a second coat.[13] .
- The smaller the roller, the more control you have over where the paint goes. Rollers create a smoother, fuller finish than paint brushes.
-
Let the walls dry overnight and peel off the tape. After applying the 2nd coat of paint, allow the stripes to dry almost completely. When the paint is still slightly wet, lift one end of the tape, and pull off the tape at a 45-degree angle from the wall. Work smoothly and quickly to avoid pulling off the paint or chipping the base.[14]
- If you pull off the tape when the paint is completely dry, you risk chipping or peeling the stripes.
- If you do have some chips or peeling, wait until the paint is dry and then use a small paintbrush to touch up the color as much as possible. You may need to re-apply the tape to get a crisp line for your stripes when doing touch-ups.
Advertisement
-
Question
What is the most effective way to paint a straight line?

Andres Matheu is the Owner of Hömm Certified Painting Systems, an Interior and Exterior Residential painting business based in the Washington, DC Metro area. Andres specializes in interior and exterior residential painting, color consultations, cabinet refinishing, wallpaper removal, and epoxy flooring among other services. An EPA Lead-safe Certified Firm, Hömm Certified Painting Systems has been awarded the Best of Houzz 2019 Service, Angie’s List Super Service Award 2019, and Northern Virginia Magazine’s 2018 Best Home Experts (painters) award.
Commercial Painter
Expert Answer
Something that helps when painting straight lines is having the pattern planned out. Mark and set the pattern using tape before you start painting.
Ask a Question
200 characters left
Include your email address to get a message when this question is answered.
Advertisement
Video
-
Plan out the pattern of your stripes beforehand to avoid having one stripe that is larger than the others.[15]
Advertisement
Things You’ll Need
- Drop cloth
- Pencil
- Ruler
- Level
- Painters tape
- Paint
- Paintbrush
- Small roller
- Basic paint tray
- Ladder or stool
References
About This Article
Before you paint stripes on a wall, decide on your design and choose 2 to 3 coordinating colors to work with. Next, remove all the furniture from the room and lay down a drop cloth. From there, prepare the walls by painting on 2 layers of your base color, which should be the lightest shade in your design. Once you’re ready to start painting, use a ruler to measure off the distance between the stripes and mark off the edges. Before painting the stripes, use painter’s tape to block off the areas on either side and protect your base coat. Scroll down to learn how to paint in the stripes!
Did this summary help you?
Thanks to all authors for creating a page that has been read 82,825 times.
Reader Success Stories
-
Ellie-May Louise Hambidge
Jan 22, 2018
«I love the room where it went from pink to orange and I have recommended them to my friend who loves zigzag…» more
Did this article help you?
Как правильно клеить гладкие обои под покраску?
Клеить гладкие обои под покраску довольно просто, но требует тщательной подготовки поверхности и точного следования инструкции. Вот шаги, которые следует выполнить при клеении гладких обоев под покраску:
-
Подготовьте поверхность: Перед клеением обоев под покраску поверхность стен должна быть чистой, сухой и гладкой. Если поверхность неровная или имеет трещины, их нужно залатать и отшлифовать.
-
Измерьте длину стен: Измерьте длину стен, чтобы определить, сколько обоев вам потребуется для покрытия стен. Добавьте 10-15% к этому количеству, чтобы учесть возможные ошибки в измерениях и обрезки.
-
Подготовьте клей: Подготовьте клей в соответствии с инструкцией на упаковке. Обычно, клей наносится на обратную сторону обоев.
-
Приклейте обои: Начните клеить обои в верхней части стены, нанесите клей на обратную сторону обоев и аккуратно приклейте обои к стене, выравнивая их на всю длину стены. Используйте рулетку для разглаживания обоев и удаления возможных пузырей в клеевом соединении.
-
Обрежьте лишнее: Обрежьте лишние края обоев вдоль углов и по периметру стены, используя острый нож или ножницы.
-
Дайте обоям высохнуть: Дайте обоям высохнуть полностью, как указано на упаковке клея, прежде чем переходить к покраске.
-
Покрасьте обои: Нанесите на обои подходящую краску с помощью кисти или валика. Помните, что для покраски гладких обоев под покраску лучше использовать краски на водной основе.
Следуя этим шагам и инструкции на упаковке, вы можете легко клеить гладкие обои под покраску и получить гладкую и красивую поверхность.